
So, of course, you want your characters to talk.
If you've only got MSPaint, I can't help. Just make a speech bubble or something. But if you've got any program that has layers and opacity settings, you can make the RO-like black transparent box behind the text, just like I do.
I use Photoshop 7.0 so the guide is based on that.
Font Options
First, choose what color you want the text to be. I use white. On the left toolbar, you should see this:

The top box is white. It's your foreground color; that means that's the color your text will be when you type. The 2nd box is background color. It's not that important. See the little arrows pointing to the boxes? If you click it, it switches the colors for you (i.e. foreground color becomes background color).
Now, select the text tool.
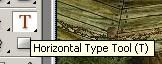
Use the top toolbar to choose your font and its settings. Whatever font you choose, I suggest you set its "a,a" to "Strong." It makes the words thicker and much more readable.

Note: Not all fonts have this setting.
I use Times New Roman because I'm boring.
Click anywhere on your background and begin typing.
If you find that the size of the text is too big, you can highlight what you've typed and then select a different size and it will change it all.
If your text looks squished, you can mess with the spacing between letters and lines by clicking the clipboard button on the left of the font options to open up more options.
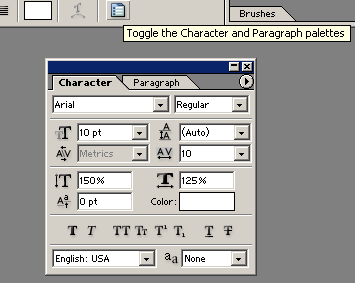
What if you want Italic text? Or Bold? Or even Bold and Italic? Select the "Roman" box and it will pulldown those options.
Note: some fonts do not have bold or italic options.

Your text WILL run off the screen. Photoshop does not word-wrap for you. You'll have to manually enter line breaks by pressing enter before it goes off the page.
You can also use the "Move" tool to move the text to make more room.

The transparent black box
First, make sure your text is where you want it to be, spelled correctly, etc.
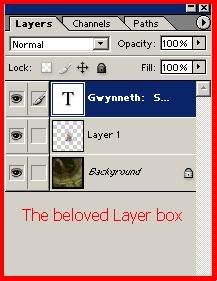
Make sure the Text Layer is on top of all your other layers (this way characters don't get in the way of the text). You can do this by selecting the text layer in the layer box and dragging it upward in the layer box. The other layers (if you have many) will be pushed below it.
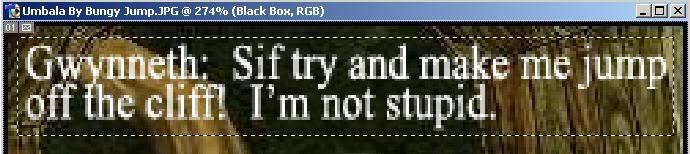
This is my Text Layer; notice it is spatially above "Layer 1" (which is my character's Layer).
On Photoshop's top menu, select Layer, go to "New" and select "Layer..."

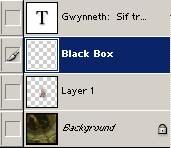
You can name layers. Click this new layer's name to rename it. I named it Black Box.
Now, click and drag the Black Box layer so that it is right -below- the text layer and -above- the character layer.
Now, select the magnifier. Right click the canvas and select "Fit on Screen." It will zoom up your image.
Select the "Regtangular Marquee Tool." It's just a fancy name for the box tool from MSPaint. Use it to draw a box around your text, like so:
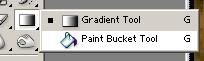
Now, right click on the "Gradient" tool and select the paintbucket, which, amazingly, acts like the paintbucket from MSPaint!
Make your foreground color black. Make sure you have the "Black Box" Layer selected and not the "Text" Layer. Use the paintbucket tool and fill in your box black.
Easy enough, eh? But you're not done yet --- it's not transparent! So, note the "opacity" setting in your layer box. It says 100%.
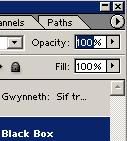
Click it and change it to 50~80% and you're done!
NB: I used to use 50% opacity, but now I use 80%. I feel that the text is easier to read this way.
Yay, you've completed a panel of your comic! Use "Save as..." to save it. Name it something obvious like "Panel01"
Save it as a .png !!
Now you want to make your second panel, right? Stop, don't close out of anything yet!
One awesome thing about Photoshop is, if you save your picture as a .PSD, it will save all of the layers and everything for you. So, if you've misspelled something, all you have to do it open the .PSD and fix it, then save the panel as a png again.
This is also useful to save your progress in case of power outs, crashes, or other interruptions.
I recommend making a .PSD for each comic you make.
Now to put it all together!
No comments:
Post a Comment